Setting-up Cryptocurrency Mining Software
- DR.GEEK

- Sep 12, 2019
- 3 min read
( 12th September 2019 )
Setting-up Cryptocurrency Mining Software and its connection to Mining Pool
Once your rig is setup with an operating system and optimized with up to date drivers you are ready to install your mining software and start mining. The cryptocurrency mining software is what instructs the hardware to do the hard work, passing through transaction blocks for it to solve. There are a variety of these available, depending on your operating system. They are available for Windows, Mac OS X, and others. There are several algorithms and coins to mine with GPUs as mentioned earlier our discussion and with that several different options for mining software. Most mining software is free to download. For popular cryptocurrencies like bitcoin, you'll find that there are multiple types of software which can be used. While many of these options will be effective, there may be slight differences that could impact your mining operation.
There are tons of great resources on installation and setup of these mining software. Almost every mining software have similar procedures to download and setup of these mining software. Before setting up your mining software, first make sure that the mining software that you are going to setup is compatible with the cryptocurrency that you wish to mine. For an example, if you choose to mine Ethereum then you must download the Ethminer (an Ethereum mining software) or other that supports Ethereum mining. Also make sure to download and setup the latest version of the mining software as they keep on updating.
Now, let’s take an example of Ethminer to follow as a guide on how to setup a mining software. The following mentioned steps could be followed to download and setup of almost every cryptocurrency miner. You can also follow the official guide available on their official websites for downloading and setting up of your mining software through internet.
Steps to Follow:
1. Download the Ethminer latest release version (that must be compatible with the OS you are using) from the GitHub or any other trusted sources.
2. Now, unzip the folder to any location of your PC.
3. After unzipping, make new txt file inside folder where ethminer.exe is located. (Note that you don't need to run exe).
4. Write your own start bat file by opening txt file you created, copy and paste this template as shown in Fig1:
ethminer.exe -U -S eu1.ethermine.org:4444 -FS us1.ethermine.org:4444 –O <YourEthereumAddress>. <WorkerNameCanBeAny>
Where:
-U CUDA mining (Nvidia technology link with list of supported GPUs
-G for OpenCL, if your card doesn’t support CUDA you need to choose only one either -U or -G
-S Stratum port of your mining pool
-FS failover stratum mining pool in case first fails (optional)
-O YourEthereumWalletAddress.WorkerName

Fig1: Example of Ethminer’s Configuration (.bat) File
To get full list of commands open command line in folder with ethminer.exe and write ethminer –help
5. After changes, save txt file and rename from anyname.txt to anyname.bat
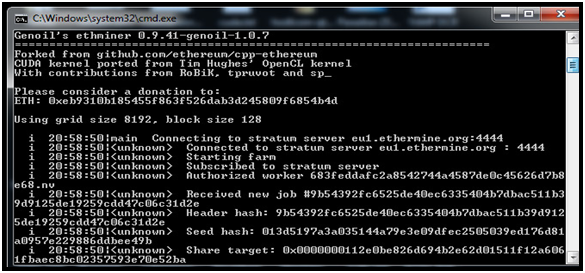
6. Now, run bat file and you’ll see the following mentioned window that indicates that your mining is now started.

Fig 2: Ethminer – A cryptocurrency mining software
The most efficient mining apps still seems to be command-line based, but there are some elegant ones with traditional graphics interfaces. In your journey you may stumble across names like Ccminer, Claymore or XMR-Stak. You'll download the software you need to mine a specific coin and edit an executable text file with details like the mining pool's URL to connect to, your wallet address and the name of your "worker" or PC. More advanced options allow you to adjust how hard your GPU or CPU works. The vast majority of this software works across Windows and Linux, although it's more difficult to configure on non-Windows systems. What makes it more challenging is that these variables are formatted differently depending on the pools and the software.


Comments