Steps to Follow:
- DR.GEEK

- Sep 14, 2019
- 3 min read
Updated: Sep 16, 2019
( 15th September 2019 )
1. You first need to make sure that you have the right amount of power to run the miner properly. Check to see what the power requirements are for the miner that you have chosen. The AntMiner S9, for example, will require 1275 watts of power. For this type of device, you would be able to connect two 110v PSUs along with a 650-watt PSU to provide the power the miner will need.

Fig1 : Antminer S9 – Power Points
2. Once you have connected the power to the miner, you will then connect the Ethernet cable to the miner. Once it is connected, you can turn on the PSU, which will allow the miner to receive power.

Fig 2: Antminer S9 Illustration
3. Connect a computer, such as a laptop or desktop, to the same network as the miner and then enter the miner’s IP address. Most of the miners available today will be DHCP enabled, so you will not have to enter the IP address manually. You can simply look at the router’s IP table and find the right one. You would also use a scanning tool that will look at all the devices connected to your network. You will find the miner on the list. Once you have the address, you can type in the miner’s address to the browser window.

Fig 3: Enter AntMiner S9 IP Address on Browser
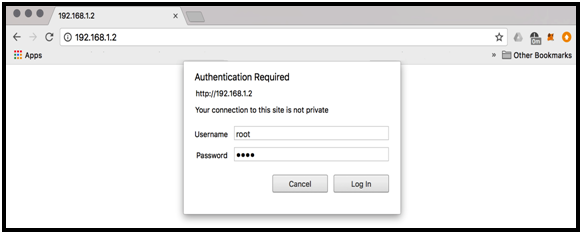
4. When you type in the address, it will take you right to the miner’s login. The username and password will usually be supplied, and you can change them later. The default for the S9, for example, is “root” for both the password and the username. As soon as you log into the site, it is a good idea to make the changes to the login credentials, and make note of them.

Fig 4: AntMiner S9 ASIC Miner’s Log-in Window
5. Once you have logged in properly, you will then head to the administration area of the miner. You can then add the information of the mining pool where you wish to begin mining. One of the best options and most profitable tends to be the Bitcoin.com Pool. To do this, you will enter the stratum/IP address of the pool along with your name and password. You can then save the settings, and the device will start to go to work.

Fig 5: AntMiner S9 ASIC Miner’s Pool Configuration
6. It is important to remember that it might take the device about 10 to 15 minutes or so to get up to speed with the hash rate. Then, you can head into the mining status page to get an idea of how well your miner is performing. In some cases, the information will provide you with an overview of how the mining operation is going, but some will offer live connections, so you can see just how much coins you are mining.

Fig 6: AntMiner S9 ASIC Miner’s Status
This is all you need to know for the basics of setting up a Bitcoin ASIC miner rig like the. They have a few steps that you need to follow, and you need to be aware that there are going to be some slightly different methods depending on the model and type of ASIC miner you choose. However, they all have similar methods of setup, and they are not too difficult for those who have at least a small amount of experience working with hardware and software. When you choose a specific model and brand of miner, it is always a good idea to read the literature that comes with the device to help with setup, and then to find online videos that are specific toward your device. These can help you ensure you are setting up your device properly.


Comments